Most bathroom faucet repairs fail not because the person doing them lacks skill, but because they fix the symptom without understanding the mechanism. You replace the washer, the drip stops for three weeks, then it's back. You swap the cartridge, but the new one came from a hardware store bin with no cycle rating on the box, and six months later you're doing it again.
I've spent over a decade on the factory floor at Wfaucet, working through finish validation, cartridge qualification, and the kind of field failure analysis that happens when a batch of faucets comes back from a distributor with warranty claims. The patterns are consistent: repeat leaks almost always trace back to one of three root causes — worn cartridge seats, degraded O-rings, or a valve seat that was never properly toleranced to begin with. Fix the right thing, with the right part, and the repair holds. Miss the root cause, and you're back under the sink in six months.
This guide walks through the full repair sequence, but more importantly, it explains why each step matters at the component level. That's the part the YouTube tutorials skip.

Why the Faucet Keeps Leaking After You "Fixed" It
Before touching a wrench, understand what actually causes a faucet to drip. There are four faucet types in common use — compression, ball, cartridge, and ceramic disc — and each fails differently. Treating them the same way is the first mistake.
Compression faucets (two separate handles, older installations) use a rubber washer pressed against a brass seat to stop flow. The washer wears down with use. The fix is straightforward — replace the washer — but if the brass seat is pitted or corroded, the new washer won't seal cleanly and the drip returns within weeks.
Ball faucets (single handle that rotates and tilts) use a slotted rotating ball against spring-loaded rubber seats. These have more parts than any other type: the ball, two seats, two springs, and multiple O-rings. When a ball faucet drips from the spout, the seats and springs are usually the culprit. When it leaks around the base of the handle, the O-rings on the ball stem have failed.
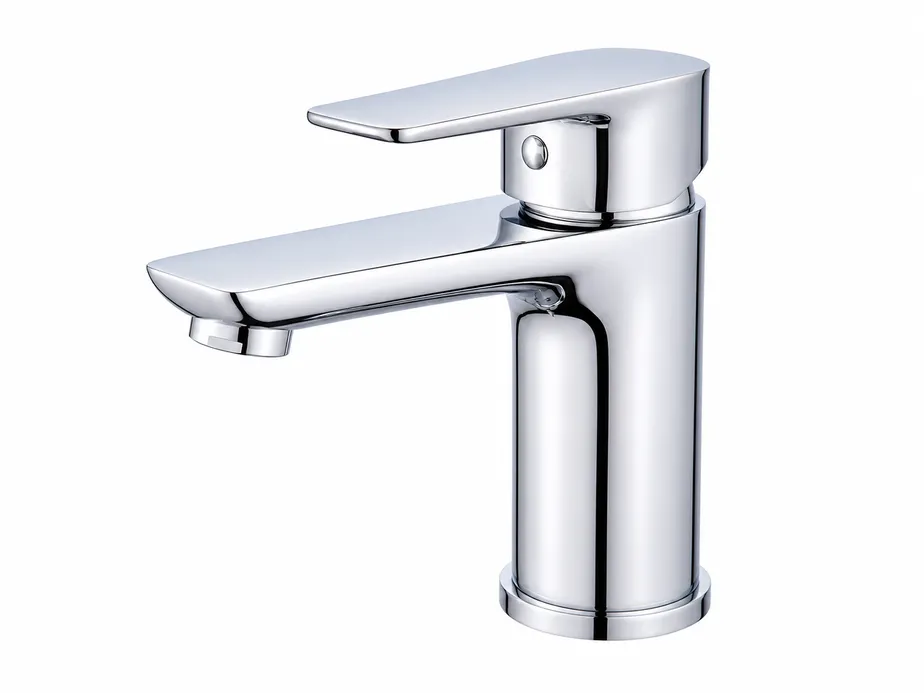
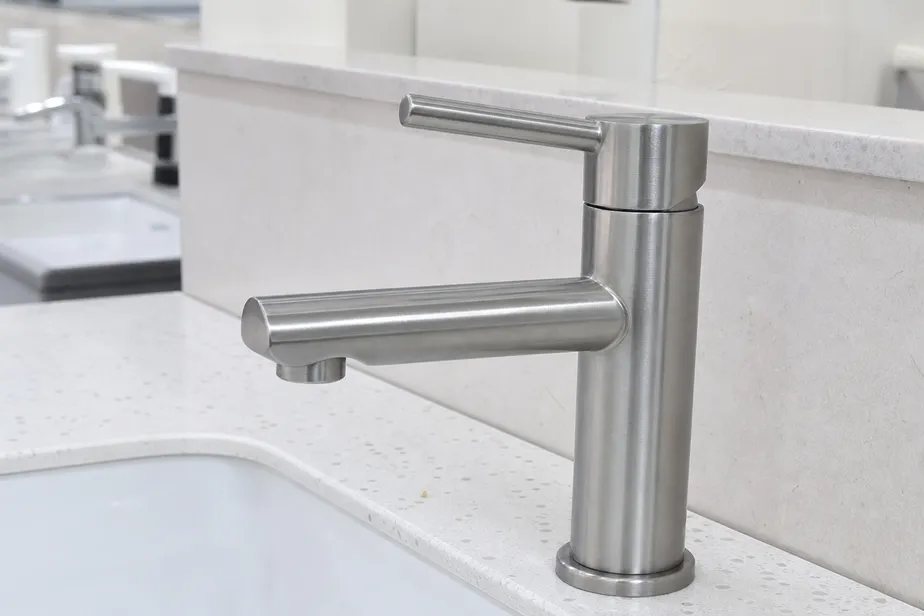
Cartridge faucets (single or double handle, the most common type in modern bathrooms) use a replaceable cartridge that contains all the sealing surfaces internally. This is the easiest type to repair correctly — one part swap covers most failure modes. The catch is cartridge compatibility: the replacement must match the original manufacturer's spec, not just the physical dimensions.
Ceramic disc faucets (single lever over a wide cylindrical body) use two ceramic discs that rotate against each other. These are the most durable type when properly manufactured, but they're sensitive to sediment and hard water deposits. A ceramic disc faucet that drips usually needs the discs cleaned or replaced, not the whole cartridge.
Misidentifying the faucet type before disassembly wastes time and risks ordering the wrong parts. Take two minutes to look at the handle configuration and the body shape before you start.
Diagnose the Failure Point Before Ordering Parts
The location of the leak tells you which component failed. Don't skip this step.
| Leak location | Most likely cause | What to replace |
|---|---|---|
| Drip from spout (handle off) | Worn cartridge or valve seat | Cartridge, or seat + washer |
| Drip from spout (handle on) | Damaged ceramic disc or ball seat | Disc set or seat/spring kit |
| Leak around handle base | Failed O-ring on stem | O-ring set |
| Leak at base of faucet body | Failed body O-ring or loose mounting nut | Body O-rings, re-torque nut |
| Leak at supply line connection | Loose compression fitting or cracked ferrule | Compression fitting or supply line |
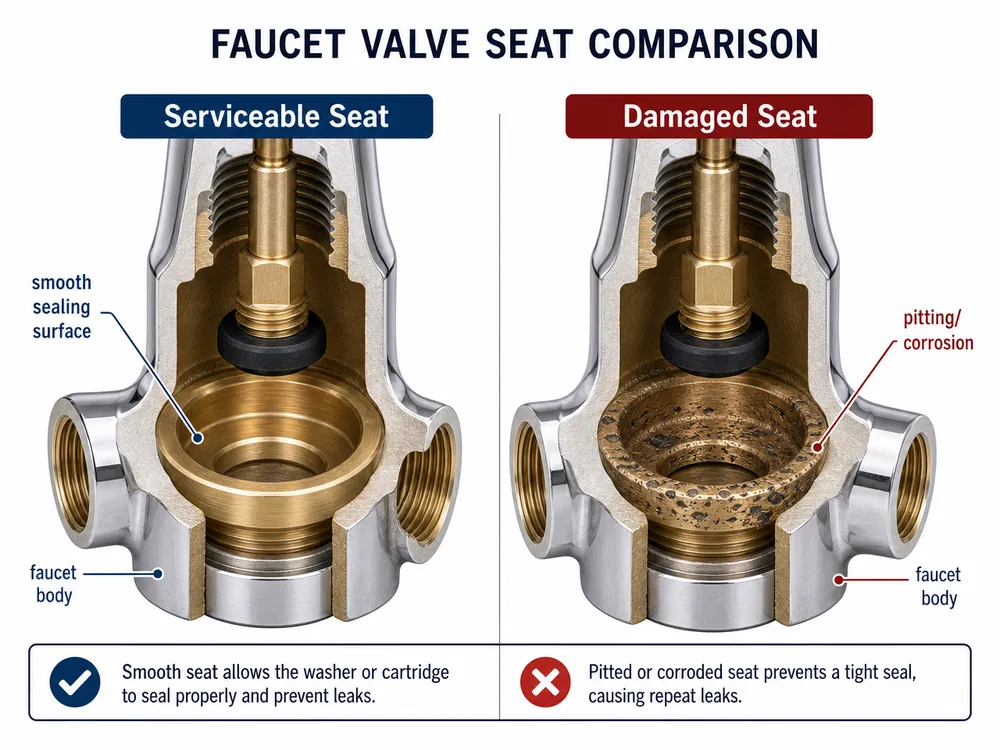
One thing I see consistently in field returns: people replace the cartridge when the actual failure is a pitted valve seat. The new cartridge seals against the same damaged seat surface and fails again within months. If you're replacing a cartridge for the second time on the same faucet, inspect the valve seat before installing the new part.
Tools and Parts: What You Actually Need
You don't need a plumber's truck. For most bathroom faucet repairs, this covers it:
Tools:
- Adjustable wrench or basin wrench (for supply line connections)
- Phillips and flathead screwdrivers
- Allen key set (handle set screws are usually 3mm or 4mm hex)
- Needle-nose pliers
- Seat wrench (for compression faucets with replaceable seats — a standard hex wrench won't fit)
- Plumber's grease (silicone-based, not petroleum — petroleum degrades rubber O-rings)
- Penetrating oil (for corroded packing nuts or stuck cartridges)
Parts — what to buy before you start:
- Replacement cartridge matched to your faucet brand and model (not just physical size)
- O-ring assortment in the correct diameter range for your faucet body
- Replacement seats and springs if you have a ball-type faucet
- Teflon tape for any threaded connections you disturb
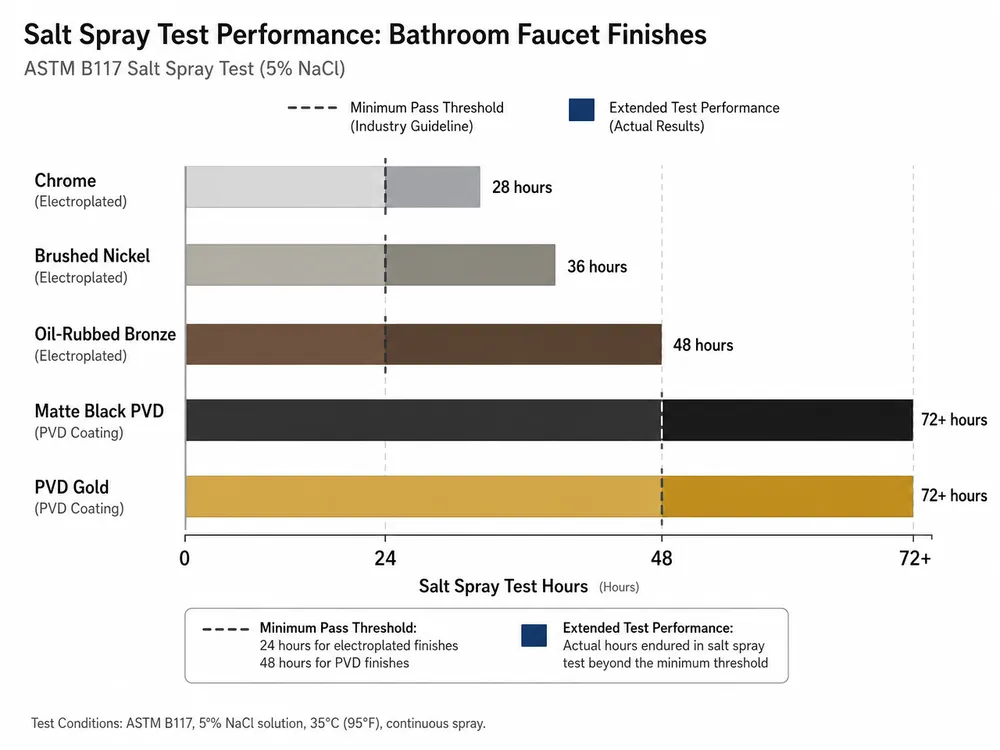
On cartridge selection: the hardware store bin with 12 "universal" cartridges is a trap. A cartridge that's 1mm too short in the stem length will seat improperly and leak from day one. A cartridge with a lower-grade ceramic disc will fail in 50,000 cycles where a properly rated one runs 500,000. (We test every cartridge batch at Wfaucet to 500,000 open/close cycles before it goes into production — that's the number that separates a faucet that holds up from one that generates warranty claims. When you're buying a replacement cartridge, ask the supplier for the cycle rating. If they don't have one, that tells you something.)
Look up your faucet's brand and model number — usually stamped on the body or printed on the original packaging — and order the OEM cartridge or a verified compatible replacement with documented specs.

Step-by-Step Repair by Faucet Type
Cartridge faucet (most common)
- Shut off the water supply. Turn the shutoff valves under the sink clockwise until they stop. Open the faucet handle to release pressure and drain the lines. If there are no shutoff valves under the sink, turn off the main supply.
- Remove the handle. Look for a decorative cap on top of the handle — pry it off with a flathead screwdriver to expose the set screw underneath. Remove the set screw (usually Phillips or hex). Pull the handle straight up. If it's stuck, don't force it sideways — that cracks the cartridge stem. Wiggle it gently while pulling upward.
- Remove the retaining clip or nut. Most cartridges are held by a U-shaped retaining clip at the top of the cartridge body. Use needle-nose pliers to pull it straight out — note the orientation before removing it. Some designs use a threaded retaining nut instead; unscrew it counterclockwise.
- Extract the cartridge. Grip the cartridge stem with pliers and pull straight up. If it won't move, apply penetrating oil around the base and wait 10 minutes. Forcing a stuck cartridge sideways damages the valve seat — the one surface you need to be intact for the repair to hold.
- Inspect the valve seat. Before installing the new cartridge, look into the faucet body with a flashlight. The valve seat is the brass ring at the bottom of the cartridge bore. It should be smooth and uniform. Pitting, scoring, or visible corrosion means the seat needs attention before the new cartridge goes in. (More on this below.)
- Install the new cartridge. Match the orientation — most cartridges have a flat side or alignment tab that must face forward. Press it straight down until it seats fully. Replace the retaining clip in the same orientation you removed it. A cartridge installed 180° off will reverse hot and cold — annoying, but fixable by rotating the cartridge.
- Reassemble and test. Replace the retaining nut or clip, reinstall the handle, and turn the water back on slowly. Check for leaks at the handle base and at the spout before calling it done.
Compression faucet (older two-handle installations)
- Shut off supply, remove handle (same as above).
- Use an adjustable wrench to unscrew the packing nut — counterclockwise. Remove the stem by turning it counterclockwise as if opening the faucet.
- At the bottom of the stem, you'll find the seat washer held by a brass screw. Remove the screw, replace the washer with an exact-size match. If the washer is beveled, the replacement must be beveled the same way.
- Inspect the seat. Run your finger around the brass seat inside the faucet body. Any roughness means the seat is damaged. A seat wrench can remove a replaceable seat for replacement. If the seat is non-removable and damaged, use a seat grinder (a $15 tool) to resurface it — two or three light passes, then clean out the brass filings before reassembling.
- Reinstall the stem, torque the packing nut snugly but not aggressively — overtightening crushes the packing and makes the handle stiff. Undertightening lets water bypass the packing and leak around the stem.
- Reassemble and test.
Ball faucet
- Shut off supply, remove handle.
- Unscrew the cap and collar (usually hand-tight or with channel-lock pliers — wrap the jaws with tape to protect the finish).
- Remove the cam, packing, and ball. Note the ball's orientation — the slot aligns with a pin inside the body.
- Use needle-nose pliers to remove the seats and springs from the two ports at the bottom of the ball chamber.
- Replace seats, springs, and O-rings as a complete kit — replacing only one component when the others are equally worn just moves the failure point.
- Reassemble in reverse order. The cam's tab must align with the notch in the faucet body.
Ceramic disc faucet
- Shut off supply, remove handle.
- Unscrew the cartridge cylinder — it usually lifts straight out after removing one or two screws.
- Remove the ceramic discs. Clean them with white vinegar and a soft cloth to remove mineral deposits. Do not use abrasive pads — ceramic disc surfaces are precision-ground and scratching them creates the leak you're trying to fix.
- If cleaning doesn't restore the seal, replace the disc set. Ceramic discs from different manufacturers are not interchangeable — the port geometry must match.
- Reassemble and test. Open the water supply slowly — a sudden pressure surge can crack a ceramic disc.
The Mistakes That Cause Repeat Leaks
These are the patterns I see in field returns. Each one is avoidable.
Installing the wrong cartridge. "Close enough" in physical dimensions is not close enough in sealing geometry. A cartridge that's 0.5mm short in stem travel won't fully close the valve. Buy the correct part.
Skipping the valve seat inspection. A new cartridge sealing against a pitted seat will fail again. The seat inspection takes 30 seconds with a flashlight. Don't skip it.
Undertorquing the packing nut. On compression faucets, the packing nut needs to be snug enough to compress the packing material against the stem. Too loose and water bypasses the packing and leaks around the handle. The right torque is firm hand-tight plus about a quarter turn with a wrench — not cranked down.
Using petroleum-based grease on rubber O-rings. Petroleum degrades rubber. Use silicone grease only. This is a slow failure — the O-ring swells and then deteriorates over weeks, and by the time it leaks you've forgotten what grease you used.
Reassembling with the cartridge rotated. Most cartridges have a specific orientation. Installing them 180° off reverses hot and cold, and in some designs it also prevents the cartridge from seating fully against the valve seat.
Forcing a stuck cartridge sideways. If the cartridge won't pull straight out, the answer is penetrating oil and patience, not lateral force. Bending the cartridge stem damages the valve seat bore — now you have a bigger problem than a drip.

When Repair Is Not Worth It
Some faucets are not worth repairing. Knowing when to stop is as useful as knowing how to fix.
Zinc alloy body corrosion. Zinc alloy (sometimes sold as "zamak" or listed as "zinc die cast") is cheaper than brass and common in lower-cost faucets. In chlorinated water systems, zinc alloy corrodes from the inside out — the body develops white powdery deposits, the threads strip more easily, and the valve seat bore loses dimensional stability. If you see white chalky buildup inside the faucet body when you disassemble it, the body itself is degrading. A new cartridge won't fix that.
We evaluated zinc alloy for a cost-reduction project a few years back and decided against it for our core body components. The long-term corrosion performance in chlorinated water markets — which covers most of North America and large parts of Europe — didn't hold up. Brass costs more to cast and machine, but it's the material that makes a faucet repairable five years after installation.
Finish failure at the body. If the chrome or plating is flaking, blistering, or showing base metal through the finish, the faucet has likely been through repeated moisture exposure that has compromised the plating stack. This is a surface symptom of a deeper corrosion problem. Repairing the valve mechanism while the body corrodes around it is a short-term fix.
Stripped threads on the packing nut or cartridge bore. If the retaining nut or packing nut threads are stripped, the cartridge won't stay seated under water pressure. Thread repair compounds can buy time, but they're not a permanent fix on a water-pressure application.
Multiple simultaneous failure modes. If you open a faucet and find a worn cartridge, degraded O-rings, a pitted valve seat, and corrosion on the body, the faucet has reached end of service life. Replacing one component at a time will keep you under the sink indefinitely. At some point, replacement is the right call.
The decision point for commercial or multi-unit applications is different from a single residential repair. If you're managing 50 guest bathrooms in a hotel and the faucets are showing consistent early failure, the repair cost per unit — labor plus parts — needs to be weighed against the cost of replacement with a product that won't generate the same failure pattern. That's a sourcing decision, not a maintenance decision.
How Build Quality Determines Whether a Repair Holds
This is the part the DIY guides don't cover, because they're written without manufacturing context.
A faucet repair holds long-term when two conditions are met: the replacement part is correctly specified, and the surfaces it seals against are within tolerance. The second condition depends entirely on how the faucet was manufactured.
The valve seat interface is the most critical dimension in a faucet body. At Wfaucet, we machine valve seat threads to ±0.05mm tolerance on CNC equipment. That tolerance matters because the cartridge's sealing geometry is designed around a specific seat diameter and depth. If the seat is out of spec — either from manufacturing variance or from wear — the cartridge can't achieve full contact across the sealing surface, and you get a slow drip that no amount of cartridge replacement will fix.
The same logic applies to cartridge quality. A cartridge rated for 500,000 open/close cycles uses thicker ceramic discs, tighter O-ring seat geometry, and better-grade elastomers than a generic replacement. The difference isn't visible from the outside. It shows up at 80,000 cycles when the generic cartridge starts to weep and the properly rated one is still sealing cleanly.
Finish quality also affects repairability in a way most people don't consider. PVD-coated handles and bodies are harder than chrome-plated surfaces — the PVD layer is 0.3–0.5μm of titanium nitride or zirconium nitride deposited at the molecular level, and it doesn't scratch or chip during disassembly the way chrome can. When you're removing a PVD-finished handle, you can use a wrench without worrying about the finish. Chrome-plated handles need tape on the wrench jaws to avoid scratching through to the nickel mid-coat. (If the chrome is already thin — meaning the factory skipped the nickel mid-coat to cut costs — even careful disassembly can damage the finish permanently.)
The practical implication: a faucet built to proper manufacturing tolerances, with a correctly rated cartridge and a properly plated finish, is worth repairing. A faucet built to the lowest cost point — zinc alloy body, generic cartridge, single-layer chrome — is often not. The repair cost is the same, but the outcome is different.
Sourcing Replacement-Grade Faucets for Commercial and Multi-Unit Projects
If you're replacing faucets across a commercial property, hospitality project, or multi-unit residential development, the repair guide above is useful context — but the real decision is upstream. Buying the right faucet in the first place eliminates most of the repair scenarios described here.
What to ask a manufacturer before committing to a bulk order:
Body material and alloy spec. Brass is the correct answer for any chlorinated water market. Ask for the alloy designation — C36000-equivalent free-machining brass is the standard for faucet bodies. If the answer is "zinc alloy" or "zinc die cast," factor in the replacement cycle when calculating total cost of ownership.
Cartridge cycle rating. Ask for the endurance test report, not just a verbal claim. A 500,000-cycle rating with documented test data is the standard for commercial-grade product. Some manufacturers test only new product introductions; ask whether every production batch is tested or only samples.
Valve seat tolerance. This is a question most buyers don't think to ask, but it's the one that determines long-term repairability. A ±0.05mm tolerance on the valve seat interface means the cartridge will seat correctly and the repair will hold. Looser tolerances mean the cartridge is compensating for dimensional variance, and that compensation degrades over time.
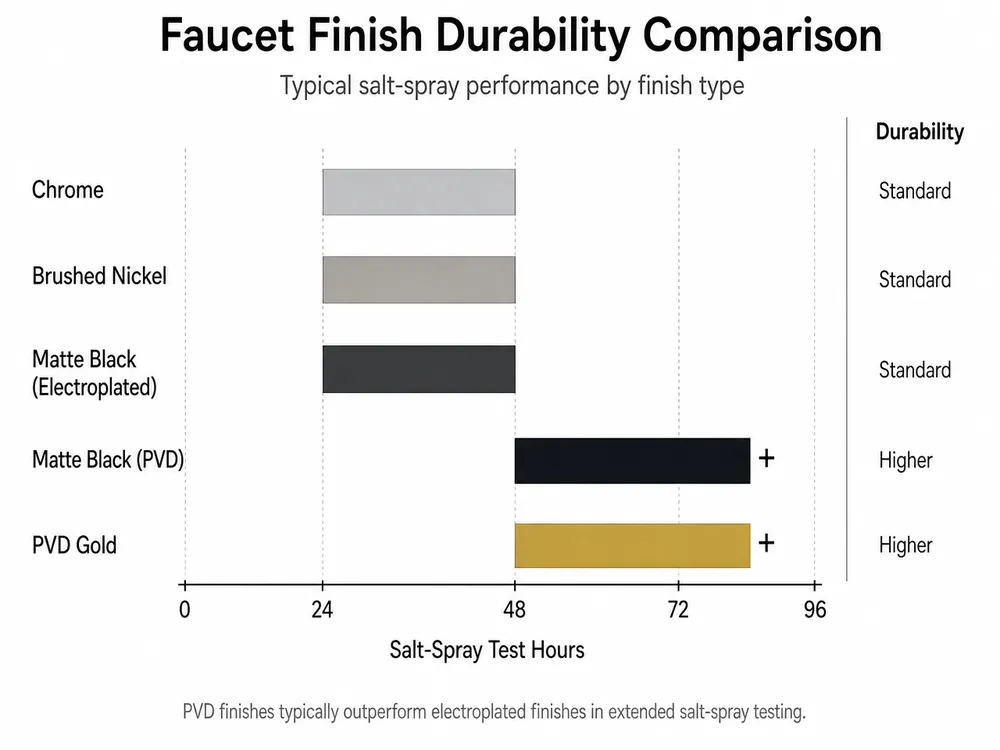
Finish certification and salt spray results. For chrome and brushed nickel, ask for salt spray test results — 24 hours minimum, 48 hours for coastal or humid climate markets. For PVD finishes, ask for adhesion test documentation. These numbers tell you whether the finish will survive the installation environment and whether the faucet can be disassembled and reassembled without finish damage.
Certification documentation for your target market. cUPC for North America, CE for Europe, WaterMark for Australia. These aren't optional for commercial projects — they're required for code compliance and insurance purposes. Ask for the actual certificates, not just a claim that the product "meets" the standard.
Our bathroom faucet catalog covers the full range of configurations we supply for commercial and residential projects — single-hole, widespread, wall-mount, and vessel configurations across five finishes. Every product in the catalog ships with the test documentation described above.
If you're evaluating faucets for a specific project and want to compare specs before committing to a sample order, the fastest path is to send us your target configuration — volume, finish, certification market, and any specific performance requirements — and we'll return a detailed quote with the relevant test reports included. You can reach us through the contact page or directly by email.
Frequently Asked Questions
Why does my bathroom faucet keep leaking after I replace the cartridge?
The most common reason is a damaged valve seat. The cartridge seals against the valve seat surface inside the faucet body — if that surface is pitted, corroded, or out of tolerance, a new cartridge won't seal cleanly regardless of its quality. Inspect the seat with a flashlight before installing the replacement. If it's damaged, resurface it with a seat grinder (for compression faucets) or replace the faucet body if the seat is integral and non-removable.
The second common reason is a mismatched cartridge. Physical dimensions that look close enough often aren't — stem travel length and sealing geometry must match the original spec. Use the OEM cartridge or a verified compatible replacement with documented specifications.
How do I know if my faucet body is brass or zinc alloy?
Weight is the first indicator — brass is significantly heavier than zinc alloy for the same size body. If you can access the inside of the body during disassembly, look for white powdery deposits or chalky buildup, which indicate zinc alloy corrosion. Brass corrodes green (verdigris) rather than white. You can also check the product documentation or contact the manufacturer with the model number.
What's the difference between a PVD finish and chrome when it comes to repair?
PVD (physical vapor deposition) finishes are harder and more scratch-resistant than chrome plating. During disassembly, PVD handles tolerate wrench contact better than chrome. Chrome-plated handles need tape on the wrench jaws to avoid scratching through to the nickel mid-coat underneath. If the chrome is thin (single-layer, no nickel mid-coat), even careful disassembly can damage the finish. PVD finishes also hold up better in humid environments, so a PVD-finished faucet is more likely to be in serviceable condition when you open it up for repair.
When should I replace a faucet instead of repairing it?
Replace when: the body shows signs of zinc alloy corrosion (white chalky deposits inside), the valve seat is non-removable and too damaged to resurface, the threads on the packing nut or cartridge bore are stripped, or you're seeing multiple simultaneous failure modes. For commercial applications, also replace when the repair cost per unit — parts plus labor — approaches the cost of a replacement unit that won't generate the same failure pattern within the same timeframe.
What cartridge cycle rating should I look for in a replacement?
For residential use, 200,000–300,000 cycles is adequate for most applications. For commercial or high-traffic installations — hotel bathrooms, office restrooms, rental properties — specify 500,000 cycles minimum. Ask the supplier for the test report, not just the claim. A cartridge with documented 500,000-cycle testing from a qualified supplier is a different product from one with the same number printed on the box without supporting data.