The wall closes, the tile goes on, and then someone discovers the valve body sits 8mm too deep for the trim kit to seat flush. At that point you're looking at a chipped tile run, a delayed handover, and an installer callback that costs more than the valve itself.
This happens on projects where the concealed shower system was specified too late — after the wall build-out was already underway, or where the valve body and trim kit were sourced from different series without checking dimensional compatibility. Neither mistake is complicated to prevent. Both are common enough that we see the downstream consequences regularly when buyers come to us after a failed installation.
This guide covers the specification decisions that need to happen before the wall closes: rough-in depth by wall construction type, valve body selection and its effect on box dimensions, trim kit compatibility, and how to get the dimensional documentation you need from your supplier before committing to a build-out.

Why rough-in errors happen at the specification stage, not the installation stage
The installer doesn't create this problem. By the time the plumber arrives, the wall framing is done, the rough-in box is set, and the tile substrate is in place. If the valve body depth doesn't match the wall construction, there's nothing the installer can do except call back the project manager.
The error originates at the specification stage, when someone selects a valve body without confirming three things:
- The finished wall thickness at the installation point
- The valve body's required rough-in depth (the distance from the finished wall face to the back of the rough-in box)
- The trim kit's minimum and maximum wall projection range
These three numbers have to work together. A valve body that requires 90mm of rough-in depth won't work in a 75mm timber stud wall with 12mm tile backer and 10mm tile — you're 17mm short before you've even started. And a trim kit designed for a 65–85mm wall projection won't seat correctly on a valve body that puts the spindle face at 95mm.
The fix is straightforward: specify the valve body and trim kit together, against the confirmed wall construction type, before the rough-in box is set. The problem is that most retail-brand installation guides assume a standard wall depth and don't give you the dimensional flexibility to adapt. That's where factory-direct sourcing changes the equation — but more on that later.
Rough-in depth requirements by wall construction type
Wall construction varies significantly across project types, and the rough-in depth requirement for a concealed shower valve has to match the actual wall assembly, not a generic assumption.
The table below covers the three most common wall construction types in hotel fit-out and residential projects:
| Wall construction type | Typical finished wall thickness | Recommended rough-in depth range | Notes |
|---|---|---|---|
| Timber stud (90mm stud + 12mm backer + 10mm tile) | 112mm | 65–90mm | Most common in North American residential; stud depth gives adequate box clearance |
| Concrete block (100mm block + 20mm render + 10mm tile) | 130mm | 75–100mm | Common in Middle East and Southeast Asia hotel projects; deeper box possible but access panel required |
| Steel stud / tile backer board (64mm stud + 12mm backer + 10mm tile) | 86mm | 55–75mm | Thinner wall assembly; requires shallow rough-in box; limits thermostatic valve options |
| Solid concrete (200mm slab + 10mm tile) | 210mm | 80–120mm | Requires chase cutting; access panel mandatory; deepest rough-in range available |
(The steel stud / tile backer configuration is the one that catches buyers most often. The 86mm finished wall depth sounds adequate until you factor in that most thermostatic valve bodies need 85–95mm of rough-in depth — you're right at the edge, and any variation in tile thickness pushes you over.)
A few practical notes on reading this table:
Confirm tile thickness before specifying. Hotel projects often use 12–15mm stone tile rather than standard 10mm ceramic. That 2–5mm difference can push a marginal installation out of spec.
Render and plaster thickness varies by contractor. On concrete block walls, render thickness is rarely exactly 20mm. Get the M&E consultant to confirm the finished wall assembly drawing before you lock in the rough-in depth.
Access panel requirements. Any rough-in depth over 100mm in a concrete or masonry wall should include an access panel in the specification. Without it, future cartridge replacement requires tile removal.

Valve body selection and its effect on rough-in box dimensions
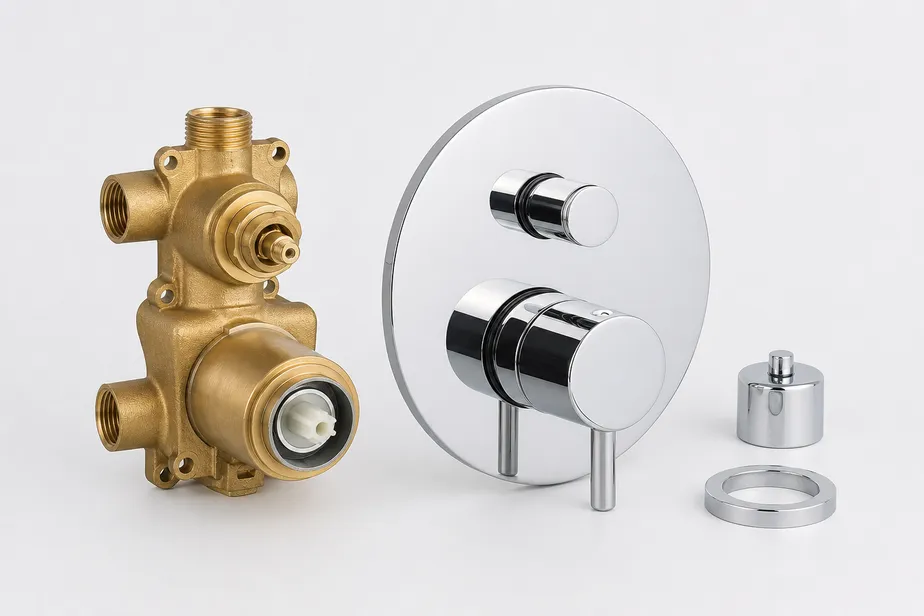
The choice between a pressure-balance valve and a thermostatic valve isn't just a performance decision — it directly affects the rough-in box dimensions and, by extension, the minimum wall depth you need.
Pressure-balance valves are the standard choice for North American residential and mid-range hotel projects. The valve body is compact: typical rough-in box dimensions run 140mm wide × 140mm tall × 65–80mm deep. They meet ASSE 1016 requirements for scald protection and are cUPC-listed for North American code compliance. For a timber stud wall, a pressure-balance valve is almost always the right call — the wall depth works, the code compliance is straightforward, and the installed cost is lower.
Thermostatic valves are the standard for European hotel fit-out and premium residential projects. The valve body is larger: rough-in box dimensions typically run 160–200mm wide × 160–200mm tall × 85–100mm deep, depending on whether the unit includes an integrated diverter. That extra depth is the specification risk. A thermostatic valve in a steel stud wall with 86mm finished depth is a problem waiting to happen — you need to either specify a shallow-body thermostatic unit (some manufacturers offer 75mm depth options) or change the wall construction.
The diverter configuration adds another dimension to this. A concealed thermostatic system with a separate diverter valve requires two rough-in boxes, and their center-to-center spacing has to match the trim kit's fixed outlet positions. Specify the trim kit first, get the outlet spacing dimensions, then set the rough-in boxes. Doing it the other way around — setting boxes at a convenient spacing and hoping the trim kit fits — is how you end up with a trim plate that doesn't cover both boxes.
For project buyers sourcing across multiple bathrooms or multiple properties, the valve body type should be locked in at the project specification stage, not left to the installer's discretion. Mixing pressure-balance and thermostatic valves across rooms in the same project creates a trim kit compatibility problem: the two valve types use different spindle interfaces, and a trim kit designed for one won't fit the other.
Browse our Concealed Shower Mixers & Sets for dimensional specifications on both pressure-balance and thermostatic configurations.
Trim kit compatibility: the spec-stage decision that gets treated as an afterthought
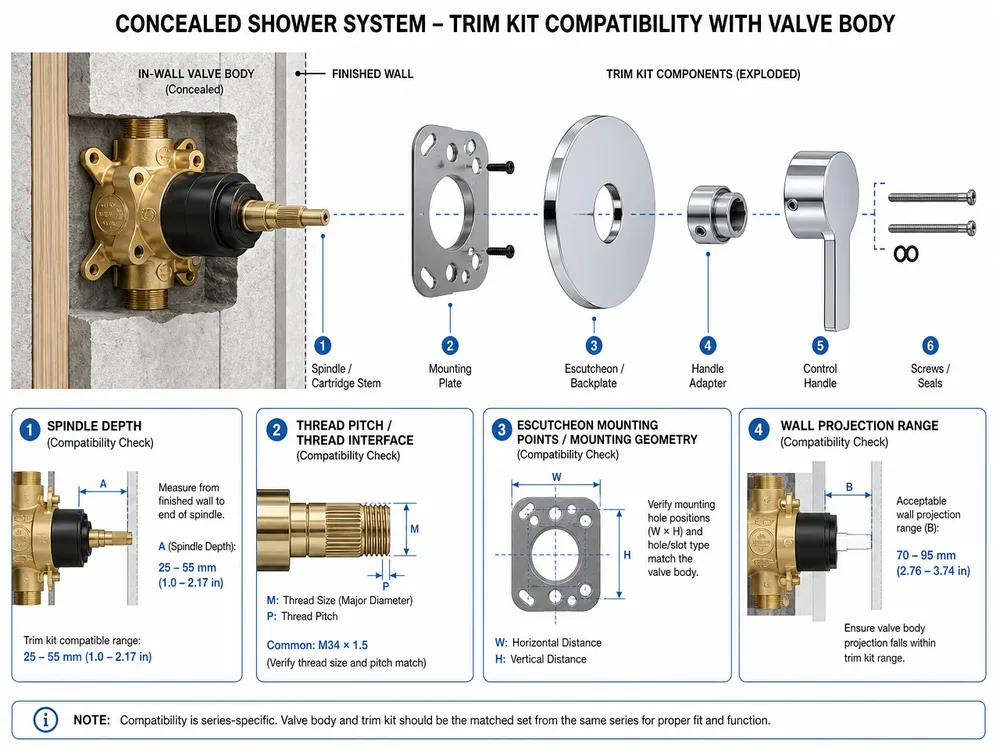
Trim kit compatibility is where the most avoidable project delays happen. The trim kit — the escutcheon plate, handle, and any outlet covers — is designed to fit a specific valve body series. It's not universal. A trim kit from one product series will not seat correctly on a valve body from a different series, even from the same manufacturer, because the spindle depth, thread pitch, and escutcheon mounting points differ.
The procurement mistake is treating the trim kit as a finish-stage decision. The logic seems reasonable: lock in the valve body early (it goes in the wall), choose the trim kit later (it's a visible finish item, so wait until the interior design is confirmed). The problem is that by the time the interior design is confirmed, the wall is closed and the valve body is set. If the trim kit the designer wants doesn't fit the valve body that's already in the wall, you're either changing the trim kit or opening the wall.
The correct sequence:
- Confirm wall construction type and finished wall thickness
- Select valve body type (pressure-balance or thermostatic) and confirm rough-in depth compatibility
- Select trim kit from the same product series as the valve body
- Confirm the trim kit's wall projection range covers your finished wall thickness
- Set rough-in boxes to the trim kit's specified center-to-center dimensions
- Issue the specification to the M&E consultant with all four dimensions confirmed
Steps 2 and 3 have to happen together. If the interior designer wants a specific trim finish — matte black, brushed gold, brushed nickel — confirm that finish is available in the valve body series before the valve body is ordered. Sourcing a matte black trim kit for a valve body that only comes in chrome trim is not a problem you want to discover after the rough-in is set.
For OEM project orders, we can supply the valve body and trim kit as a matched set with confirmed dimensional compatibility — the trim kit is specified against the valve body at the factory, not assembled from separate catalog items in the field. See our concealed shower trim kit compatibility page for series-specific dimensional data.

Step-by-step specification checklist for M&E consultants and project procurement teams
This checklist is designed to be handed to the M&E consultant or site engineer at the specification stage — before the rough-in box is set.
Phase 1: Wall construction confirmation
- [ ] Confirm wall construction type at each installation point (timber stud / steel stud / concrete block / solid concrete)
- [ ] Confirm finished wall thickness: stud depth + substrate thickness + tile thickness
- [ ] Confirm tile thickness (standard ceramic 10mm vs. stone 12–15mm)
- [ ] Confirm render or plaster thickness on masonry walls
- [ ] Flag any installation points where finished wall thickness is under 90mm
Phase 2: Valve body selection
- [ ] Confirm valve type: pressure-balance (ASSE 1016) or thermostatic
- [ ] Confirm rough-in depth of selected valve body against finished wall thickness
- [ ] For thermostatic systems: confirm whether integrated diverter is required
- [ ] For multi-outlet systems: confirm number of rough-in boxes and center-to-center spacing
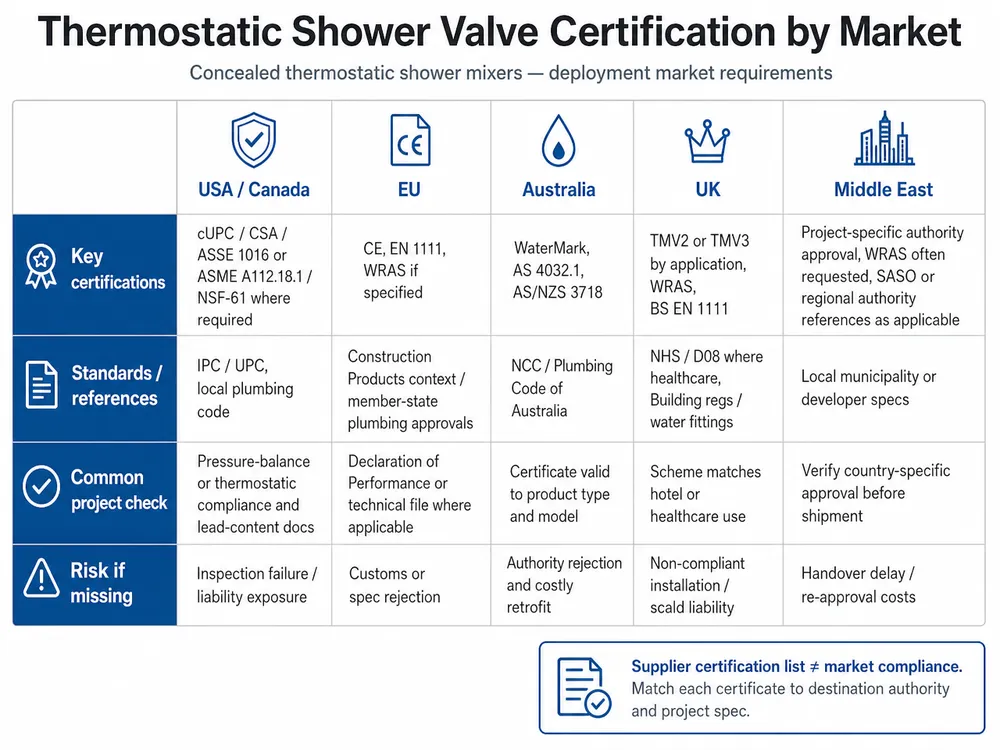
- [ ] Confirm certification requirement for destination market: cUPC (North America), CE (Europe), WRAS (UK), WaterMark (Australia)
Phase 3: Trim kit compatibility
- [ ] Select trim kit from the same product series as the valve body
- [ ] Confirm trim kit wall projection range covers finished wall thickness
- [ ] Confirm finish availability in the selected valve body series
- [ ] For thermostatic systems: confirm trim plate covers both valve body and diverter rough-in boxes
- [ ] Confirm center-to-center outlet spacing matches trim kit fixed positions
Phase 4: Documentation
- [ ] Request dimensional drawing from supplier (rough-in box dimensions, spindle depth, outlet positions)
- [ ] Request installation specification sheet (rough-in depth range, wall thickness range, access panel requirements)
- [ ] Confirm test reports for destination market certification
- [ ] Issue confirmed specification to M&E consultant before rough-in box installation begins
(We've seen projects where the M&E consultant received a valve body model number but no dimensional drawing. The installer set the rough-in box based on the previous project's dimensions — different wall construction, different valve body. The checklist above exists because that scenario is more common than it should be.)
Common specification mistakes and what they cost
Under-specifying wall depth. The most frequent error. A buyer specifies a thermostatic valve body without confirming the finished wall thickness at the installation point. The rough-in box is set, the wall closes, and the trim kit won't seat because the spindle face is 12mm too deep. Remediation: tile removal, rough-in box repositioning, retiling. On a 50-room hotel project, this mistake in 10 rooms adds weeks to the handover schedule.
Mixing valve bodies and trim kits from different series. Happens when the valve body is sourced from one supplier and the trim kit is sourced separately — or when a field substitution is made because the specified trim kit is out of stock. The spindle interface doesn't match, the escutcheon doesn't seat flush, and the handle doesn't engage correctly. The fix is either a new valve body or a new trim kit, both of which require wall access.
Omitting access panel requirements. On concrete and masonry walls with rough-in depths over 100mm, future cartridge replacement requires tile removal unless an access panel is specified. This is a maintenance cost that lands on the building owner, not the project contractor — but it generates callbacks and warranty disputes that reflect on the supplier.
Specifying the trim finish before confirming availability in the valve body series. Interior designers often specify a finish (brushed gold, matte black) without checking whether that finish is available in the valve body series that fits the wall construction. If the finish isn't available in the right series, the project either changes the finish or changes the wall construction — neither is a good outcome at the specification stage.
Not requesting dimensional drawings before the rough-in is set. Retail-brand installation guides give you a single nominal rough-in depth. They don't give you the tolerance range, the minimum and maximum wall thickness the trim kit accommodates, or the outlet center-to-center spacing for multi-outlet configurations. Without that data, the installer is working from a nominal spec and hoping the actual installation falls within range.
How to get factory dimensional drawings before the wall closes
For project procurement, the documentation you need before setting rough-in boxes is:
- Rough-in box dimensional drawing: overall box dimensions (W × H × D), mounting flange dimensions, and the distance from the finished wall face to the valve body spindle face
- Trim kit projection range: minimum and maximum finished wall thickness the trim kit accommodates
- Outlet center-to-center spacing: for multi-outlet thermostatic systems, the fixed spacing between valve body and diverter rough-in boxes
- Access panel recommendation: whether the supplier recommends an access panel for the specified rough-in depth
From a retail brand, getting this documentation before purchase is often difficult — the installation guide ships with the product, and the product ships after the order is placed. By the time you have the dimensional data, the rough-in box may already be set.
From a factory-direct supplier, this documentation is available at the specification stage, before the order is placed. At Wfaucet, dimensional drawings and installation specification sheets ship with every order — but for project procurement, we provide them at the RFQ stage so your M&E consultant has the data before the wall build-out begins. For OEM orders, we can adjust the rough-in depth to match your specific wall construction — something a fixed-spec retail brand can't offer.
The concealed shower mixer and concealed thermostatic shower mixer pages include dimensional data for our standard configurations. For project-specific requirements — custom rough-in depth, specific certification, matched valve body and trim kit sets — send us your wall construction type, outlet configuration, finish, and target market, and we'll return a dimensional specification sheet and RFQ within one business day.
Specification FAQ
What rough-in depth should I specify for a hotel project with concrete block walls?
For 100mm concrete block with 20mm render and 10mm tile, your finished wall thickness is approximately 130mm. Specify a rough-in depth of 80–100mm. A thermostatic valve body in this range works well — you have enough wall depth for the larger box, and the access panel requirement is straightforward to include in the specification. Confirm the actual render thickness with the site contractor before finalizing; render on concrete block varies by 5–10mm depending on the applicator.
Can I use the same trim kit on a pressure-balance valve and a thermostatic valve?
No. Pressure-balance and thermostatic valve bodies use different spindle interfaces, different escutcheon mounting geometry, and different rough-in box dimensions. Trim kits are series-specific. If you're specifying both valve types across a project (pressure-balance in standard rooms, thermostatic in suites), you need two separate trim kit specifications — and you should confirm with your supplier that both are available in the same finish.
What certifications do I need for a concealed shower valve in a North American project?
cUPC listing is the standard requirement for North American plumbing code compliance. Some jurisdictions also require ASSE 1016 compliance for the pressure-balance function (scald protection). For Canadian projects, confirm whether the provincial code requires NSF/ANSI 61 certification for wetted components. At Wfaucet, our concealed shower systems carry cUPC certification — test reports are available at the RFQ stage.
How do I specify a concealed shower system for a project where the wall construction varies across rooms?
This is common in hotel fit-out where standard rooms have timber stud walls and suites have concrete block. The cleanest approach is to specify two valve body configurations — one for each wall type — and use the same trim kit series across both, confirming that the trim kit's wall projection range covers both finished wall thicknesses. If the trim kit range doesn't span both wall types, you'll need two trim kit specifications. Get the dimensional drawings for both configurations before the rough-in boxes are set in either room type.
What's the minimum order quantity for OEM concealed shower systems with custom rough-in depth?
At Wfaucet, OEM orders start at 200 pieces. For custom rough-in depth modifications, we typically require 500 pieces minimum to justify the tooling adjustment — below that, the per-unit cost of the modification doesn't make commercial sense for either side. For standard rough-in depths (65–100mm range), our catalog configurations cover most project requirements without custom tooling. Send us your project brief and we'll confirm whether a standard configuration works or whether a custom depth is needed.
If your project is at the specification stage and you need dimensional drawings before committing to a wall build-out, request a quote with your wall construction type, valve type, outlet configuration, and target market — we'll return the specification sheet the same business day.