The tile is already on the wall. The fit-out team is drilling the trim kit aperture. The valve body sits 8mm too deep, and the trim plate won't seat flush. Or worse — the drill bit catches a stress fracture in the tile substrate and the whole panel cracks.
Both scenarios are fixable. Neither is cheap. On a hotel project with 80 bathrooms, a rough-in depth mismatch that generates even one callback per five rooms adds up to a rework cost that exceeds the value of the valves themselves. The frustrating part is that this failure almost always originates at the specification stage, weeks before anyone picks up a drill.
This guide covers how to get the specification right before the wall closes.

Why the Failure Starts at Procurement, Not on Site
The standard narrative blames the installer. The valve body is in the wrong position, the tile cracked, the trim kit doesn't fit — and the site team gets the call. But in most cases the installer was working with a valve body that was never specified to match the wall construction in the first place.
Concealed shower mixers are not dimensionally interchangeable. A valve body designed for a 100mm timber stud wall with 12mm tile backer board and 10mm porcelain tile has a total available cavity depth of roughly 78mm after substrate and tile thickness. A valve body with a 90mm rough-in depth projection will sit flush. A valve body with a 105mm projection will sit proud of the finished wall surface, and no amount of installer adjustment will fix that without cutting into the substrate.
The problem compounds when you're sourcing from a supplier who ships a standard valve body without dimensional drawings, or whose spec sheet lists "rough-in depth" as a single number without clarifying whether that measurement is to the face of the rough-in box, the centerline of the valve, or the back of the mounting flange. We see this regularly on orders where the buyer sourced on price and received a product with ambiguous documentation. By the time the discrepancy surfaces on site, the wall is tiled and the options are expensive.
The fix is upstream: confirm the valve body's dimensional envelope against your wall construction type before you commit to a build-out.
Rough-In Depth Requirements by Wall Construction Type
Wall construction varies significantly across project types, and the available cavity depth for a concealed valve body changes with every variable — stud spacing, insulation, backer board thickness, tile thickness, and adhesive bed depth all affect the final number.
The table below gives working ranges for the three most common wall construction types in hotel and residential fit-out projects. These are practical planning figures; always verify against your specific wall build-up with your structural or M&E consultant.
| Wall Construction Type | Typical Total Wall Depth | Tile + Adhesive Allowance | Available Valve Cavity Depth |
|---|---|---|---|
| Timber stud (90mm) + 12mm backer board | 102mm | 18–22mm (10mm tile + 8–12mm adhesive) | 78–84mm |
| Concrete block (100mm) + 12mm plaster | 112mm | 18–22mm | 88–94mm |
| Metal stud (70mm) + 12mm backer board | 82mm | 18–22mm | 58–64mm |
| Concrete block (150mm) + 12mm plaster | 162mm | 18–22mm | 138–144mm |
| Tile backer board only (25mm) on concrete | 25mm + concrete | 18–22mm | Valve must recess into concrete — requires core drilling |
The metal stud scenario is the one that catches people most often. A 70mm metal stud wall with backer board gives you a cavity depth of under 65mm after tile and adhesive. Most standard concealed valve bodies are specified at 75–90mm rough-in depth. That's a guaranteed conflict on a metal stud wall unless you've sourced a valve body specifically dimensioned for shallow installations, or you've built out the wall depth with a second layer of backer board.
(We've had buyers come to us mid-project with exactly this situation — metal stud walls already framed, standard valve bodies already ordered. The options at that point are: add a second backer board layer before tiling, which adds cost and changes the tile layout; or source a shallow rough-in valve body and delay the order. Neither is a good position to be in.)

Valve Body Type and Its Effect on Rough-In Projection
The valve body type you specify — pressure-balance or thermostatic — affects more than water temperature control. It directly affects the physical depth of the rough-in box and the clearance required for tile drilling.
Pressure-balance concealed mixers use a single cartridge that balances hot and cold supply pressure to prevent scalding when another fixture draws water. The valve body is typically compact: rough-in box depth runs 65–85mm on most production models, and the trim kit aperture is a single circular cutout. Tile drilling is straightforward — one hole, standard diamond core bit, low cracking risk if the tile is properly supported.
Thermostatic concealed mixers use two cartridges: one for temperature control, one for flow/volume. The valve body is wider and deeper. Rough-in box depth on a standard two-handle thermostatic runs 85–110mm, and the trim kit requires two apertures drilled in precise alignment. Misaligned drilling on a large-format porcelain tile — the kind used in most hotel bathrooms — is where tile cracking becomes a real risk. The stress concentration between two closely spaced holes in a brittle substrate is significant, and if the tile isn't fully supported from behind during drilling, the panel can fracture between the holes.
The practical implication: if your wall construction gives you a cavity depth under 80mm, a standard thermostatic valve body is likely to conflict. You either need a shallow-spec thermostatic (available from some manufacturers, including as a custom configuration from us), or you need to reconsider the wall build-up before framing begins.
For hotel projects specifying across 50+ bathrooms, the valve body type decision should be locked before the M&E drawings are issued. Changing from pressure-balance to thermostatic mid-project means re-specifying rough-in box dimensions, re-issuing installation drawings, and potentially reframing walls that were already built to the original spec.
Tile Cracking Risk: The Mechanism and How to Prevent It
Tile cracking during concealed mixer installation is almost always a substrate or drilling problem, not a tile quality problem. Understanding the mechanism helps you prevent it at the specification stage.
The three most common causes:
1. Valve body projection proud of the substrate surface. When the rough-in box projects beyond the tile backer board surface, the tile sits on the box flange rather than fully on the substrate. The tile is effectively bridging a gap. When the installer drills the trim kit aperture, the unsupported tile section flexes under drill pressure and cracks. The fix is ensuring the rough-in box is recessed flush with or slightly behind the substrate face before tiling begins.
2. Insufficient tile support during drilling. Large-format porcelain tiles (600×600mm and above, common in hotel bathrooms) have low flex tolerance. Drilling without a backing support — a piece of plywood or a rubber pad held firmly against the tile face — allows the tile to vibrate and crack. This is an installation practice issue, but it's worth specifying in your installation documentation if you're supplying product to a fit-out team.
3. Tile adhesive not fully cured before drilling. Drilling into a tile that's been laid within 24 hours of drilling is a common site-schedule mistake. The adhesive hasn't reached full bond strength, so the tile can shift under drill pressure. Standard cement-based tile adhesives need 24 hours minimum before drilling; rapid-set adhesives need at least 4–6 hours. Your installation spec should call this out explicitly.
The upstream prevention: confirm that the rough-in box is specified to sit flush with the substrate, and that your installation documentation includes a curing wait time before trim kit installation begins.

The Specification Checklist: What to Confirm Before Wall Build-Out
This is the sequence that prevents the problems described above. Run through it before the M&E drawings are finalized and before any wall framing begins.
Step 1 — Confirm wall construction type and total cavity depth
- Identify stud or block type and depth
- Add backer board or plaster thickness
- Add tile thickness (measure the actual tile, not the nominal spec — large-format porcelain often runs 9–11mm, not the 8mm nominal)
- Add adhesive bed depth (typically 8–12mm for wall tiles)
- Subtract 5mm safety margin
- Result = maximum valve body rough-in depth
Step 2 — Confirm valve body type and rough-in depth from supplier
- Request the dimensional drawing, not just the spec sheet
- Confirm whether the rough-in depth measurement is to the face of the rough-in box, the valve centerline, or the mounting flange — these can differ by 10–15mm
- Confirm trim kit projection depth (how far the trim plate extends beyond the tile face)
- Confirm trim kit aperture diameter and center-to-center spacing for thermostatic models
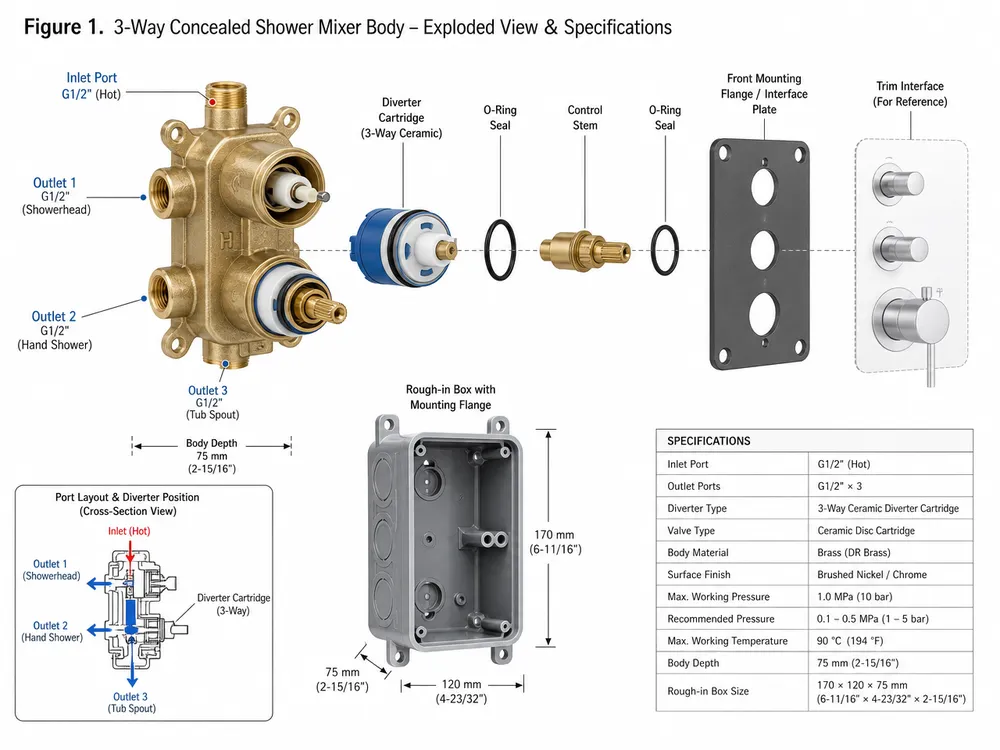
Step 3 — Confirm outlet configuration
- Two-way (shower head + handshower) or three-way (shower head + handshower + bath spout)?
- Outlet port positions and spacing — these must align with your plumbing rough-in positions
- Diverter type: integral to the valve body, or separate diverter valve?
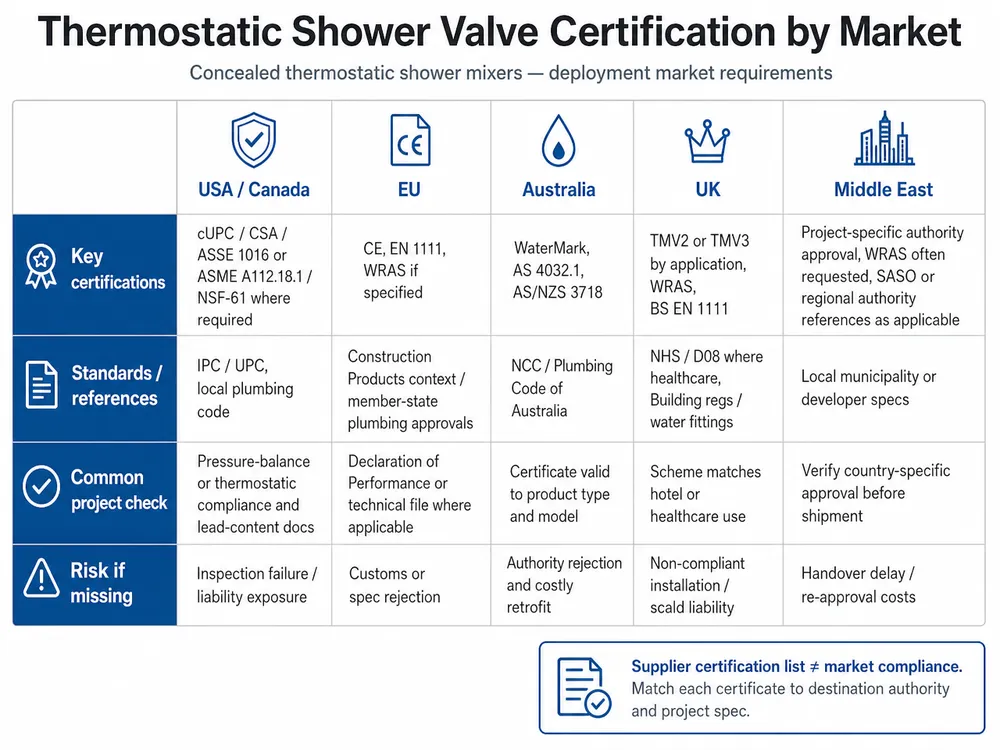
Step 4 — Confirm certification requirements for your destination market
- North America: cUPC compliance required for most jurisdictions
- Europe: CE marking; WRAS approval for UK projects
- Australia: WaterMark certification required
- Request the actual certificate numbers, not just a claim of compliance — your project compliance team will need them
Step 5 — Request installation drawings before committing to the build-out
- Full dimensional drawing with rough-in box position, supply pipe centerlines, and outlet port positions
- Minimum wall cavity depth callout
- Tile drilling template or aperture dimensions for trim kit installation
(We ship dimensional drawings and installation specs with every order as standard. For OEM orders, we issue the drawings before production begins so your site team can verify against the wall build-up before the first unit ships.)
Common Specification Mistakes and How They Play Out on Site
These are the errors we see most often when buyers come to us after a project has already run into trouble.
Specifying rough-in depth from a catalog number without requesting the dimensional drawing. Catalog specs often list a single "rough-in depth" figure that refers to the rough-in box depth only. The actual valve body projection — including the mounting flange and supply connections — can add 15–20mm to that number. On a tight wall cavity, that's the difference between a clean install and a conflict.
Ordering a trim kit from a different series than the valve body. Concealed mixer trim kits are not universally interchangeable. A trim kit from one product series will not seat correctly on a valve body from another, even from the same manufacturer. The aperture diameter, the trim plate seating depth, and the handle attachment mechanism are all series-specific. If you're sourcing valve bodies and trim kits separately — or mixing catalog generations — verify compatibility explicitly before ordering.
Omitting tile thickness from the cavity depth calculation. A 10mm porcelain tile plus 10mm adhesive bed adds 20mm to the wall face. On a 90mm timber stud wall, that leaves 70mm of cavity depth. A valve body specified at 75mm rough-in depth will project 5mm proud of the substrate. That 5mm is enough to prevent the trim plate from seating flush and to create the bridging condition that leads to tile cracking.
Specifying a standard valve body for a metal stud wall without checking cavity depth. Metal stud walls are common in commercial fit-out and hotel renovation projects. The 70mm stud depth is a known constraint, but it's frequently overlooked when the specification is written by someone working from a standard residential spec template.
Two-Way vs. Three-Way Concealed Mixer: Outlet Configuration and Its Specification Implications
The outlet configuration affects both the valve body dimensions and the plumbing rough-in layout, so it needs to be locked early.
A two-way concealed mixer controls flow to two outlets — typically overhead shower and handshower. The valve body has two outlet ports, and the diverter (if included) is usually integral. This is the standard configuration for most hotel guest bathrooms and residential shower enclosures.
A three-way concealed mixer adds a third outlet — typically a bath spout or a body spray. The valve body is physically larger, the rough-in box is deeper, and the plumbing rough-in requires three outlet pipe positions instead of two. On a project where some bathrooms have bath/shower combinations and others are shower-only, specifying a three-way valve body across all rooms simplifies procurement (one SKU) but adds unnecessary depth to the shower-only installations.
The practical recommendation: specify two-way for shower-only bathrooms and three-way only where a bath spout or additional outlet is actually required. Mixing configurations on a large project is manageable if the dimensional drawings are issued per room type — which is standard practice on hotel fit-out projects with M&E drawings.
For Concealed Shower Mixers sourced from us, we supply both two-way and three-way configurations with matched trim kits, and we can configure the rough-in depth to your wall construction type on OEM orders.
How to Request Factory Dimensional Drawings from Your Supplier
If your current supplier doesn't provide dimensional drawings as standard, ask for them explicitly before placing an order. A supplier who can't produce a dimensional drawing with the following information is a sourcing risk on any project where wall build-out is involved:
- Overall valve body dimensions (width × height × depth)
- Rough-in box depth from the mounting flange face
- Supply pipe centerline positions (hot and cold) with spacing dimensions
- Outlet port positions and spacing
- Minimum wall cavity depth requirement
- Trim kit aperture diameter and center-to-center spacing (for thermostatic models)
- Trim plate projection depth beyond tile face
These are not custom requests. Any manufacturer running a concealed shower system product line should have this documentation ready. If they don't, the product was likely designed for domestic market distribution where installation documentation standards are lower — and that's a signal about the overall quality discipline of the supplier.
We issue dimensional drawings for every concealed mixer model in our catalog, and for OEM orders we issue project-specific drawings that reflect the buyer's confirmed wall construction type and outlet configuration. The drawings ship with the order and are available digitally before production begins.
For buyers sourcing across multiple markets, our Concealed Shower Mixers & Sets carry cUPC, CE, and WaterMark certifications — so the same valve body covers North American, European, and Australian project requirements without managing separate supplier relationships for each market.
The Specification Sequence in Summary
The right sequence is: wall construction confirmed → cavity depth calculated → valve body type and rough-in depth specified → dimensional drawings reviewed → build-out begins. Every step that gets skipped or reversed adds cost downstream.
The most expensive version of this problem is a tiled wall that needs to be partially demolished to reposition a valve body. We've seen it happen on hotel projects where the specification was done in a hurry and the dimensional drawings were never requested. The rework cost on a single bathroom — tile removal, substrate repair, replastering, retiling, and reinstallation — typically runs several times the cost of the valve itself.
Getting the spec right before the wall closes costs nothing. It requires a dimensional drawing from your supplier, a wall build-up calculation from your M&E team, and a five-minute check against the table in this guide.
If you're sourcing concealed shower mixers for a hotel fit-out, a residential development, or a distribution catalog and want to confirm the right rough-in depth configuration for your wall construction type, send your project brief to Request Quote — wall construction type, outlet configuration, finish, and target market — and we'll return a dimensional specification sheet within one business day.